
Pictures of Omnidirectional Microphones with microlet speaker.
Pictures of Omnidirectional microphones


Sound Echo Test
- Published in Technology
Testing Omnidirectional Microphones

Testing Omnidirectional MicroPhones:
I purchased a set of 5 omnidirectional microphones with an amplifier and microlet speaker and tested all of them for detecting the sound range in all angles, I found that one of them is not able to detect the sound at all angles and has very short range. So I am not planning to use that in my final design.
- Published in Technology
Sound Test using Max9812 microphone amplifier module

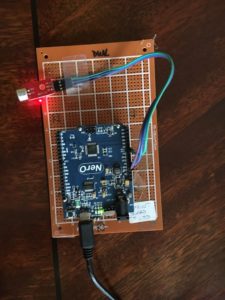
Sound Test Using MAX9812 microphone amplifier module:
I bought the microphone amplifier module from Amazon and connected as shown in the image. it has 3 pins.
- GND
- VCC, which can be either 3.3V or 5V (a 3.3V stabilizer is included)
- OUT, which should be connected directly to an arduino analog input pin
GND pin is connected to Ground of Arduino Uno
VCC is connected to 5V of Arduino Uno board.
Out data pin is connected to A0 port.
Arduino Sketch:
//size of the window
const int inputWindow = 100;
// placeholder for a single measurement
unsigned int inputSample;
void setup() {
// initializing the serial communication
Serial.begin(9600);
}
void loop() {
// two variables for minimum and maximum values in window
unsigned int inputMax = 0;
unsigned int inputMin = 1024;
// loop for the window
for (unsigned int i = 0; i < inputWindow; i++) {
// read in a single value
inputSample = analogRead(A0);
// get the minimum and maximum value
inputMin = min(inputMin, inputSample);
inputMax = max(inputMax, inputSample);
}
// send the values on serial
Serial.print(“Min: “);
Serial.print(inputMin);
Serial.print(” Max: “);
Serial.print(inputMax);
Serial.print(” Diff: “);
Serial.print(inputMax – inputMin);
Serial.println();
}
Output of the sketch in the serial windows looks like this:
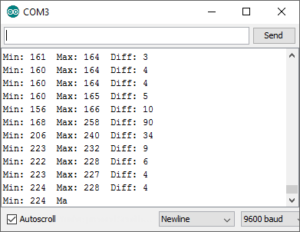
Serial Monitor Window
- Published in Technology
- 1
- 2